Sunday, 28 September 2014 17:40

How to Change the 2013/2014 TDSB Desktop Wallpaper

So not too long ago, the TDSB implemented what seemed to be an "unchangeable" desktop wallpaper. It was originally speculated that it was just an image that was being displayed over the actual desktop. This, for the most part, turned out to be true. Thanks to the TDSB understanding less about how Windows works than the students, we have figured out a way around the overlapping image.
Steps
1
Start by picking a wallpaper: preferably one larger than the resolution of the screen attached to the computer.
2
Right click the image and click the "Save image as" option. Save the image to your desktop with the name "tdsb.jpg".
3
If the computer is running Windows XP, click the start button in the bottom left and select "Run". In the run textbox, type %systemroot% and hit enter. If the computer is running Windows 7, just open the start menu and type %systemroot% into the search bar at the bottom. If for some reason you do not have access to the "run" feature, simply open up any explorer window (Ex. Home Drive) and type %systemroot% into the address bar.
4
Find the image. When you are at systemroot (It will appear as "C:\Windows"), you will have to search for a file named tdsb.jpg. When you find it, replace it with your version of tdsb.jpg. If you cannot find tdsb.jpg, just drag your tdsb.jpg version into the folder and it will still work.'
5
Log off and back on and voilĂ ! You have a new desktop wallpaper!

How to Calm Yourself Down with Cold Water

Sometimes when a person is upset, anxious or feeling sick, cold water can help to calm the person down, help them to relax, or help relieve any discomfort.
Steps
1
Find a source of cold water (doesn't have to be super cold) such as a sink tap, ice bottle, or wet towel.
2
Take a deep breath and splash cold water on your face.
1.This triggers the mammalian diving reflex that is genetically in all animals including humans
2.The lower temperature of the water and you holding your breath also causes your body to think it's diving into cold water
3.This reflex also slows your heart rate down in order to preserve oxygen for your vital organs. You use oxygen more efficiently.
3
See if you feel more relaxed and have a slower heartbeat.


How to Cook Fish

Fish is an extremely versatile food that can be prepared in a wide variety of tasty ways. Not only is fish extremely tasty, but it contains lots of nutritional protein and healthy fats, such as omega 3 acids. Any cook worth his or her salt will have to know how to prepare fish at some point in their lives, and this is as good a place as any to learn. So grab a fillet, a pan, your natural curiosity, and an appetite. Let's cook!
Part 1 of 3: Mastering the Cooking Basics!
1
Source the freshest fish available. Of course, fresh ingredients is important anytime you're cooking, but with fish, it's especially important. You can disguise some three-day old chicken pretty easily, but it's much tougher to disguise some cod that's been sitting around for three days. In order to cook the best fish of your live, you'll want to get cozy with your fishmonger.
The best trick to getting the freshest fish available is to simply ask. Go up to the fishmonger manning the fish in your local grocery store and ask him what's fresh today. This will sometimes require being flexible about the kind of fish you cook, but it's for the better. Fresh fish almost invariably tastes better than old fish, whether it's salmon, mackerel, tuna, or swordfish — the list goes on.
The freshest fish will smell of the sea (briny) but not fishy; the gills should be bright and moist; the meat firm and springy; and the scales should not be dull or flake off easily.
2
Get familiar with your thermometer. The secret to cooking fish is knowing the temperature at which they're finished cooking. In order to do this, you'll want to use a food thermometer until you get the hang of things and can tell whether your fish is done by touching or merely looking at it. Most fish are perfectly cooked when they reach an internal temperature of 120° - 145°F (~49° - 63°C).[1][2]
3
Know that it's okay to undercook most fish. Ever heard of sushi? Or how about ceviche? These are two fish dishes that are not cooked at all. Unlike undercooked poultry, which carries the risk of salmonella, fish are okay to eat undercooked or even raw.[3][4]
Although raw or undercooked fish can contain parasites, the incidence rate of serious health concerns is serially overstated.[5] You should feel very safe eating undercooked fish.
Some fish are better raw (or undercooked)! Fish like tuna are often given a light sear on both sides before removing from the heat and serving. Tuna tartar, famously, isn't cooked at all.
4
Know the three basic kinds of fish. Fish come in three basic varieties, each of which tends to be cooked in a different way and contains different nutritional properties. Knowing your way around the basic varieties will help you become a better cook:
White fish — cod, plaice, sole, and haddock, among others. These fish have translucent skin that turns an opalescent white when being cooked. Usually battered and deep fried, they form the basis of the classic English fish and chips.
Oily fish — salmon, trout, and sardines, among others. Oily fish are oilier than other varieties, but contain good oils (omega 3 fatty acids). They are often grilled, baked, or steamed.
Shellfish — shrimp, scallops, mussels, and oysters, among others. Shellfish are categorized either as "crustaceans" (shrimp) or "mollusks" (oysters). Commonly bottom feeders, shellfish are harder to digest than either white or oily fish.
5
Experiment with marinades, but know that most fish taste wonderful with just salt and pepper. There are tons of different marinades that you can experiment with when cooking fish — soy sauce and honey works great on salmon, while olive oil and lemon work nice on whitefish. But ultimately, great fish — like great meat — tastes exquisite when you let the taste of the actual fish, and not the marinade, take over.
6
Cook with your fish as dry as possible. Dry off your fish before cooking, whatever method of cooking you decide to use. Especially important for frying or pan-frying, excess moisture will cool down hot oil. Try to pat down fish fillets or steaks with a dry paper towel before cooking for best results.
7
Thaw your fish before cooking. For best results, of course, you'll want to use fresh fish. But let's face it — fresh fish is expensive, a luxury that not all of us can afford. Frozen fish is a nice alternative, but you'll want to thaw your fish for a day in the refrigerator before cooking for best results. Oh, and remember to pat it down to remove excess moisture before cooking!
You can bake frozen fish, for example, but you'll want to double the normal cooking time from your recipe. Cooking frozen fish is very tricky however, and shouldn't be done as a rule of thumb if you can afford it.
Part 2 of 3: Different Types of Cooking!
1
Try grilling fish. Perfect for summer months, grilling fish is both easy and enjoyable. With your coals or gas grill, you'll want to try to make a hot pile and a cold pile, so that you can cook the fish over low heat for the majority of the time, and then give it some color by finishing the cooking over high heat at the very end. Be sure to use the thermometer to get the temperature correct, and remember that fish cooks extremely quickly![6]
When grilling fish, be sure to oil the grill and the fish generously before cooking. A well-oiled fish and grill will keep the fish from sticking to the grate when you choose to flip it. If you want to, you can also use an aluminum foil pouch to keep the fish in as it cooks; this saves cleanup time and cooks the fish very nicely.
Remember to choose the right kind of fish for grilling. Meaty, hearty fish like salmon, halibut, and swordfish work best on the grill, especially if you can get them cut into steaks.[7] Delicate white fish like cod, flounder, or sole tend to fall apart easier on the grill, making for a less than ideal marriage between grill and fish.
2
Bake, bake away. Probably the healthiest cooking option available, baking relies on dry heat and less oil to thoroughly bring the fish to perfection. Line a baking tray with wax paper or aluminum foil, thoroughly oil the fish (or paint with a dab of melted butter), and cook at a lower heat for a longer time. Here's some more specific pointers for you to remember as you bake fish:
If you're baking with a fish fillet that has a thicker center and thin sides, curl the thin sides underneath the fish as it cooks.[8] That way, the sides won't be overcooked be the time the rest of the center is done.
Decide on your cooking temperature. Because fish are delicate and dry out easily, a lot of cooks recommend baking fish at low temperatures (think 250° F) for longer periods (20 minutes for fillets). For thicker (center cut) fish, many chefs recommend cooking at higher temperatures (400°F) for less time (15 minutes), although cooking times depend on the thickness of the cut.[9]
Try the 10-minute rule for baking fish, or "Canadian cooking method."[10] Measure the cut of fish at its thickest point. For every inch of thickness, cook for 10 minutes at 400° - 450°F. Pro-rate the ratio for uneven thicknesses. For example, a 1.5 inch center cut piece of salmon should be cooked for 15 minutes at around 425° F.
For added flavor and moisture, think about adding herbs and aromatics to your baked fish. Lemon and capers or dill works great with salmon as well as with other types of fish. Bread crumbs work well with white fish, particularly tilapia.
3
Pan-fry your fish to perfection. Pan frying gives you the option of being a little more creative with your fish. Not only can you dredge your fish in flour or corn meal to get a nice crunchy exterior, but you can also make sauces from the juices leftover in the bottom of the pan. Here are some secrets for pan-frying fish to perfection.
Start off with enough oil and a hot pan. Oil your steel pan generously but not excessively and get it hot. Starting off hot helps cook the skin on the fish quickly, allowing it to adhere to the meat of the fish for nice presentation and an even nicer feel in the mouth.
Always pan-fry with skin side down to begin with. That way, your skin browns evenly and adheres to the meat of the fish.
After a minute or two on medium or high heat, turn the heat down to medium-low or low.[11] Cook the fish slowly from here on out. Cook too hot at the moisture will evaporate from the fish before it's fully cooked, leading to a drier fish.
Flip once! Start off cooking the fish skin side down at high temperature. Turn the temp down significantly, and continue cooking for a little bit. Flip the fish once, and only once. Continue cooking the fish until your thermometer reads about 137°F.
4
Poach your fish. The idea behind poaching is to cook the fish through by submerging it in a hot or simmering, but not boiling, liquid inside a covered pan. The liquid should consist mostly of water, but other ingredients are usually added to increase the flavor. White wine and salt are commonly used, along with herbs (thyme, rosemary, parsley, etc.) and/or vegetables (onions, celery, carrots, etc.).
Try poaching with court bouillon, an excellent poaching liquid. Court bouillon is commonly made out of water, salt, white wine, vegetables (usually mirepoix) and a bouquet garniMake Bouquet Garni, or herb bouquet.
There are two ways to poach: The "deep" poach, which is completely submerging the fish in a poaching liquid, or the "shallow" poach, where the fish is partially submerged in poaching liquid. Deep poached fish typically do not need a cover for the pot, while shallow poached fish typically do.
In general, your poaching liquid should only be about 160 - 180ÂşF. This means a slight shimmering or quivering on the surface of the liquid, and maybe a bubble or two there. For hotter, simmering poaching liquids, the cooking time will decrease significantly.
Which fish are great for poaching? Arctic char, barramundi, halibut, mahi mahi, striped bass, sturgeon, and tuna all work excellent in poaching liquid.
5
Fry fish. Fried fish feeds the soul. Although it is less healthy than poaching or baking, it can elevate an "ordinary" fish like catfish into an art form. Fish are usually battered and then dunked into a hot pan filled with oil. Here are some basics for you to remember as you fry fish:
Decide on dredge vs. batter. You can dredge your fish in flour and egg, making for a lighter fish, or whip up a batter out of beer or buttermilk for a thicker, crunchier shell. Cooking times do not vary significantly for either method.
You'll most likely want your oil to be at around 375ÂşF when you start frying, and cook the fillets for about 3 to 4 minutes, or until golden brown. One trick for determining whether you've got the right heat for frying is to float a strike-anywhere match on top of the frying liquid. The match has a flash point of 365ÂşF, around the ideal cooking temperature. It's not a Martha Stewart-approved trick, but it will definitely get the job done!
Part 3 of 3: Trying Specific Recipes!
1
Make almond crusted salmon. The crisp nuttiness of almonds marries perfectly with the rich, unctuousness of the salmon. A no-nonsense alternative to breaded salmon!
2
Grill up a whole sea bass. That's right, a whole fish. In many cultures the eyes and cheeks of a fish are considered a delicacy. Stuffed with some fruits, veggies, or herbs, this makes a truly transcendent dish.
3
Try fennel topped trout. This recipe involves fennel, which doesn't overpower the delicate trout. Add in ginger, shallot, and lemon peel, and you've got a nice little slaw to go over your trout.
4
Make some lemon-baked cod. Cod can be baked to perfection with just a little bit of butter, lemon, and onion. Delicious!
5
Fry up some flounder. This bottom-feeding fish with two eyes on one side of its face is surprisingly delicate, seeing as it doesn't move around very much and thus has a high fat content. For a quick but tasty morsel.


How to Apply Light Makeup for Fall

Effortless, great looking makeup for fall is something every woman can achieve with simple methods. This article will teach you how to apply suitable, light make up that works well for the fall season.
Steps
1
Use a moisturizer. If you are applying makeup in the morning, your face can be dry after sleeping. Moisturizer protects the skin for the day and will give your skin a renewed and soft look. Do this before anything else.
2
Use a mirror with the proper light. Find a room where the lighting does not make your face appear too pale or tan. Poor lighting can lead to putting too much of a darker or a lighter color than works for your complexion and tones. This can make your skin color seem pallid or overdone.
3
Apply blush. Use just enough to make your whole face the same color, and to bring out the cheeks so they look naturally rosy. This will give your appearance a fresh and healthy appeal.
4
Use brown or black eyeliner. Apply the eyeliner to the under part of your eye. It becomes too noticeable and penetrating when applied to the top of the eye.
5
Add eyeshadow. Use a brown, gold, or a slightly reddish-orange eyeshadow. These colors pick up the fall color themes and are pleasantly muted without being too pale. Only apply the eyeshadow on the lower area of your eyelids, or again, it risks looking too overdone.
If you do feel like experimenting though, try applying a thin layer of eyeshadow in and over the globe line. Check closely and from a distance in the mirror to appraise its enhancing value for your complexion before deciding to keep it or not.
6
Add the lipstick and lip gloss (if using). Apply a thin layer of a quality, natural or earthy lipstick or lip gloss.
Applying too much gloss can make your lips stand out more than needed, which is not appealing.
Apply a darker color to the lips if your eyeshadow is light, and a lighter color to the lips if the eyeshadow is slightly heavy. This creates a pleasant and balanced contrast.
7
Add the mascara and eyeliner. Brown is a good color to use for the fall season, but black can do as well. Apply a thin layer of eyeliner in the wet area under your eyes, and the corners if you prefer. Apply mascara as you normally like it. Your makeup look for fall is now complete––simple, elegant and neither understated nor overstated.


How to Apply Corpsepaint

Corpsepaint, not to be confused with zombie makeup, dead makeup, or Goth makeup, is a makeup style favored by black metal bands. It was originated by the vocalist of Mayhem, Per "Dead" Ohlin, who wanted to look like a corpse on stage. To apply corpsepaint, follow these directions.
Steps
1
Apply a thin layer of white base on your face. Make sure you use enough to make your face at least several shades lighter, but not enough so that you look like a geisha or a clown. Generally, it's a good idea to include your jaw line and neck unless you want a "mask" or "floating face" effect.
2
Apply white or translucent powder over the white base (optional). Though this step can be skipped, it will help keep the white base from smudging/melting off your face or into the rest of the color.
For extra hold, repeat Steps 1 and 2 until a mask-like effect is achieved.

3
Liberally apply either dark blue/purple/black eyeshadow around your eyes. There should be enough to cover the entire space between your eyebrow and eyelash. Apply a reasonable amount beneath your eye.
Instead of simply applying it so that it contours to your eye socket, try going for a spider-webbed, stitched, shattered, dripping, or vine-y effect.
4
Apply a wide layer of black eyeliner around your eyes. This helps to bring out the eye shadow and your natural eyebrows.
5
Apply dark lipstick if desired. Match the colour to what’s around your eyes for a more cohesive effect. Again, consider creating a secondary effect such as stitching or dripping instead of simply drawing perfect lines.


How to Wear Makeup at 40 and Over

As a professional makeup artist I get to meet and work with women of all ages. The one thing I notice is the need for 40+ women to update their makeup looks and learn to apply age appropriate makeup. What worked for you in your 20's and 30's often times will not work for you in your 40+ years. Here are my 10 tips for updating your makeup look.
Steps
1
Use less. Less is more as you age so it’s important to use less product on your face. Try using half the amount of foundation you usually do or try mixing your foundation with your favourite moisturizer for a sheerer, more modern look. Be sure and blend your foundation right down your neck so that you look as if you’re wearing no makeup at all
2
Try using foundations that are moisturizing and non drying. As you mature your skin requires more moisture and using a foundation rich in moisture will help you look soft and beautiful
3
When using concealers, use a very small amount and blend well so that the product does not sit right into your lines and wrinkles
4
Take a look at your makeup bag and toss out or give your daughter or granddaughter any eyeshadows that have shimmer, frost or glitter in them. These products look great only on young plump skin but for 40+ skin they get into your fine lines and wrinkles and accentuate them. Instead look into purchasing matte eyeshadows in soft natural colours.
5
Change your lipstick colour. Many women continue to use the same lipstick that looked great on them 20 years ago when most often the colour is no longer suitable for their lip size and skin tone. Opt for colours that brighten your face and compliment your makeup look
6
Learn how to re-apply your makeup every decade. Just as it’s important to initially learn how to apply makeup when you’re a teenager, re-learning the right technique for your age range is vital in looking and feeling age appropriate at all times

7
Be sure and use mascara on all your eyelashes even the little ones as this creates a more youthful look. But don’t overdo it. Purchase mascara in brown or black-brown and stay away from coloured mascara’s. These are great for 20 year olds but not appropriate for 40+. One or two coats of mascara should be enough to create an opened eye effect
8
Watch the amount of eyeliner you use. Eyeliner is a great asset to your makeup routine however too much of anything isn’t good! Use soft kohl pencils that blend easily and create softer more natural looks
9
Blend, blend, blend. It’s important to create a natural look and blending is the key. Use professional brushes and soft sponges to create seamless makeup looks
10
Find blushes that add a youthful glow to your skin with peach or pink undertones. Stay away from blushes with too much frost as these age your skin. Opt for matte blushes and blend well.


Saturday, 27 September 2014 11:13

How to Build a Supercomputer

Are you in need of a machine that can deliver hundreds of trillions of floating-point calculations per second? Or are you in need of a bar story about how the supercomputer in your basement flipped a breaker? Building your own High Performance Compute cluster, a.k.a. supercomputer, is a challenge any expert geek with a weekend of free time and some cash to burn can tackle. Technically speaking, a modern, multi-processor supercomputer is a network of computers working together in parallel to solve a problem. This article will briefly describe each step in the process, focusing on hardware and software.
Steps
1
First determine the hardware components and resources needed. You will need one head node, at least a dozen identical compute nodes, an Ethernet switch, a power distribution unit, and a rack. Determine the electrical demand, cooling and space required. Also decide on what IP address you want for your private networks, what to name the nodes, what software packages you want installed, and what technology you want to provide the parallel computing capabilities (more on this later).
Though the hardware is expensive, all software listed in this how-to is free, and most are open source.
If you would like to see how fast your supercomputer would theoretically be, use this tool: http://hpl-calculator.sourceforge.net/
2
Build the compute nodes. You will need to assemble the compute nodes or acquire pre-build servers.
Choose a computer server chassis that maximizes space, cooling, and energy efficiency.
Or you can utilize a dozen or so used, outdated servers - whose whole will outweigh the sum of their parts yet save you a sizable lump of cash. All processors, network adapters, and motherboards should be identical for the whole system to play together nicely. Of course, don't forget about RAM and storage for each node and at least one optical drive for the head node.
3
Install the servers into the rack. Start from the bottom, so the rack isn't top heavy. You will need a friend to help you with this - the dense servers can be very heavy and guiding them into the rails that hold them into the rack is difficult.
4
Install the Ethernet switch above the server chassis. Take this moment to configure the switch: allow for jumbo frame sizes of 9000 bytes, set the IP address to the static address you decided on in step 1, and turn off unnecessary routing protocols such as SMTP Snooping.
5
Install the PDU (Power Distribution Unit). Depending on how much current your nodes may need at maximum load, you may need 220 volts for high performance computing.
6
With everything installed, you can begin the configuration process. Linux is the de facto OS for HPC clusters–not only is it the ideal environment for scientific computing, but it doesn't cost a thing to install it on hundreds or even thousands of nodes. Imagine how much it would cost to install Windows on all those nodes?
Begin with installing the latest version of the motherboard BIOS and firmware, which should be the same on all nodes.
Install your preferred linux distro on each node, with a graphical UI for the head node. Popular choices include CentOS, OpenSuse, Scientific Linux, RedHat, and SLES.
This author highly recommends using the Rocks Cluster Distribution. In addition to installing all the tools necessary for a compute cluster to function, Rocks uses a great method for 'distributing' many instances of itself to the nodes very quickly using PXE boot and the Red Hat 'Kick Start' procedure.
7
Install the message-passing interface, resource-manager, and other necessary libraries. If you didn't install Rocks in the previous step, you will have to manually setup the necessary software to enable the parallel computing mechanisms.
First you will need a portable bash management system, such as the Torque Resource Manager, which allows you to break-up and distribute tasks to multiple machines.
Pair Torque with the Maui Cluster Scheduler to complete the setup.
Next you will need to install the message passing interface, necessary for the individual processes on the separate compute nodes to share the same data. OpenMP is a no-brainer.
Don't forget the multi-threading math libraries and compilers to build your parallel computing programs. Did I mention that you should just install Rocks?
8
Network the compute nodes together. The head node sends the compute tasks to the compute nodes, which in turn must send the result back, as well as sending messages to each other. The faster the better.
Use a private ethernet network to connect all the nodes in the cluster.
The head node can also act as a NFS, PXE, DHCP, TFTP, and NTP server over the Ethernet network.
You must separate this network from public networks, which ensures that broadcast packets don't interfere with other networks in your LAN.
9
Test the cluster. The last thing you may want to do before releasing all this compute power to your users is test it's performance. The HPL (High Performance Lynpack) benchmark is a popular choice for measuring the computational speed of the cluster. You will need to compile it from source with all possible optimizations your compiler offers for the architecture you chose.
You must, of course, compile from source with all possible optimization options for your platform. For example, if using AMD CPUs, compile with Open64 with -0fast optimization level.
Compare your results on TOP500.org to compare your cluster to the fastest 500 supercomputers in the world!


How to Add a Sound Device to a Computer

Are you looking for a way to add a sound device to your computer? Well, here is a simple solution so easy, that even a cave man can do it!
Steps

1
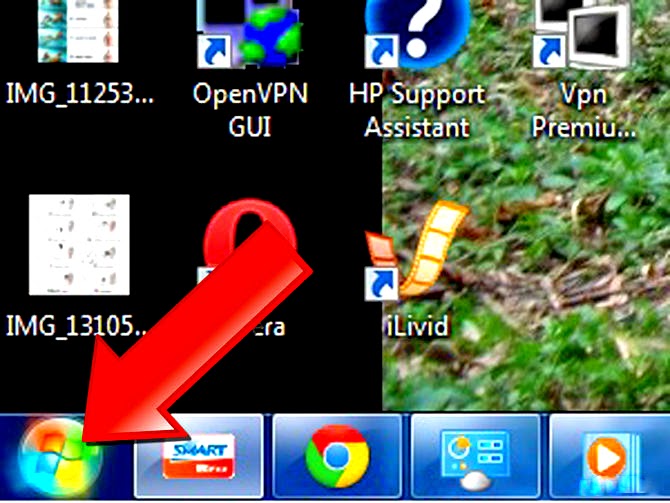
Go to your start menu. It's the button in the bottom left or top left corner on your computer.
2
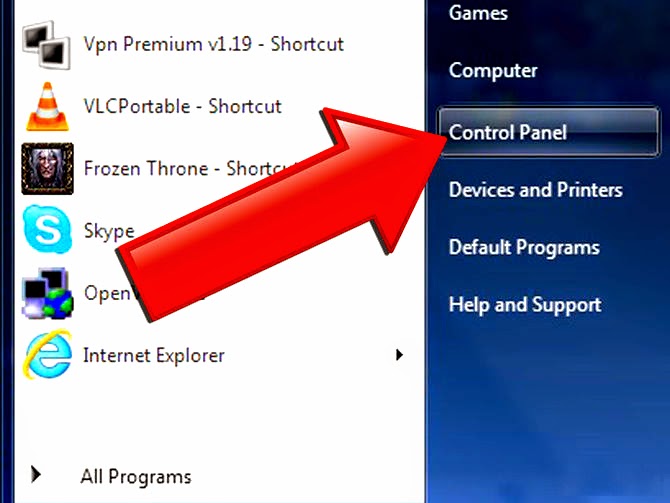
Once you have pressed the start menu button, your computer menu should pop up on the side. Do not go to "Programs". Instead, look on the right column and search for the control panel.
3
Click on it and wait a while for the control panel to load.
4
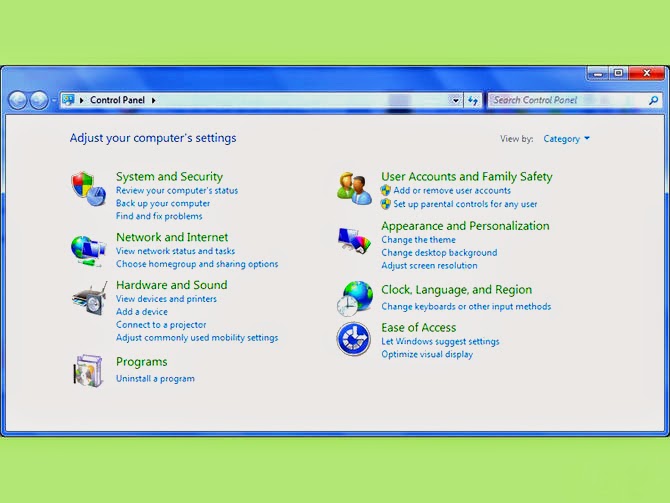
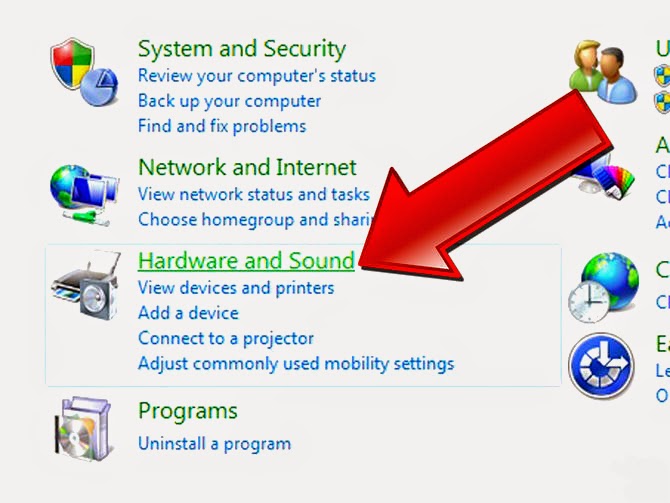
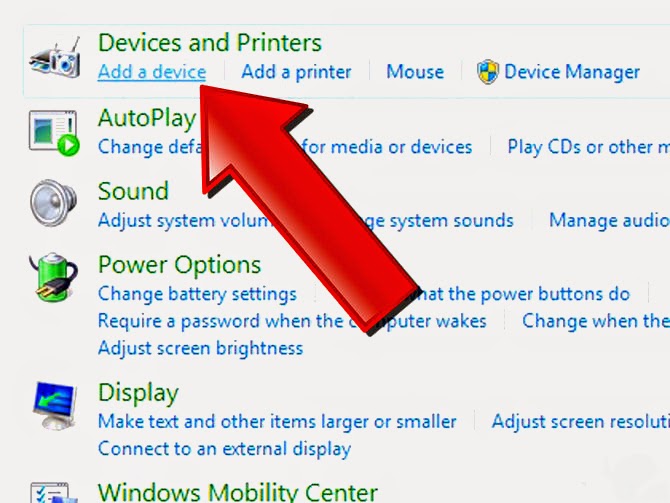
Within a few seconds, your control panel should pop-up. Proceed looking through the different icons until you see a button that says "Hardware and Sound."
5
Click where it says "Add a device".
6
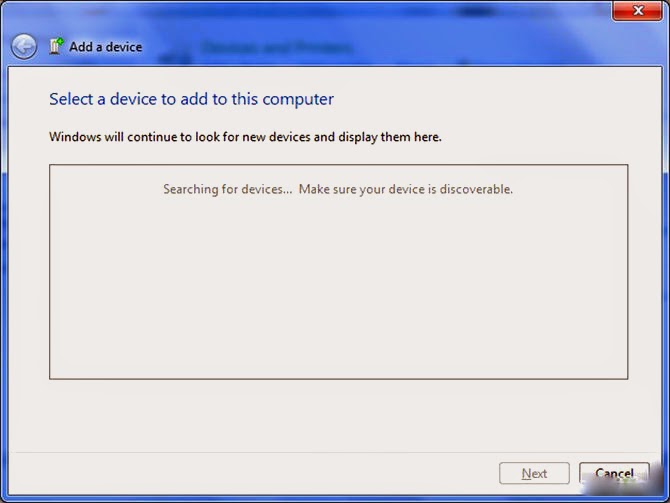
Follow the set up wizard to add the device.


How to Add a Printer to Mac or iOS Devices

Are you finding it difficult to add a printer to your Mac device? When the print command is given to the Mac OS X app, then printing dialog appears representing a sheet with the window. In the printer popup menu, you can check the lists of all the available printers that can be used to accomplish printing jobs. The Apple Mac OS X device has the built-in software for few printers, this helps in automatically adding printer to the list when USB port is needed.
Steps
1
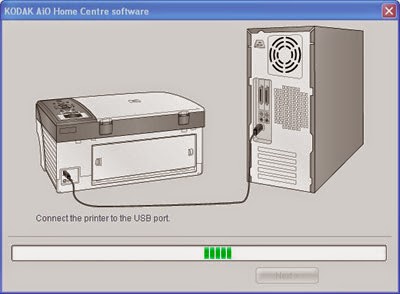
Connect Printer to the PC. Before you begin with the printing process, make sure the printer is properly connected to your computer system, and check all the cables are plugged in nicely. Then turn on the device.
2
Browse Printer Menu. In the Mac OS X v 10.2.8 or earlier versions, you can go in the ‘Printer’ menu to select ‘Edit Printer List’. As soon as you do this, the Printer List window appears soon. You can now select the ‘Show Printer List’ in the ‘View’ menu and then the ‘Printer List window’ appears
3
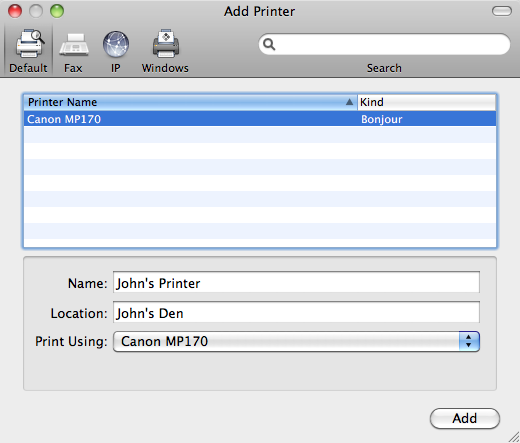
Add Printer. Now look for the ‘Add Printer’ button and click it for establishing connectivity with the printer and the computer system.
4
Complete USB Printer Connectivity. In the first popup menu, you have to select USB. Then your printer appearing in the list is selected. Click on ‘Add’ option. After completing the connectivity, close the ‘Printer List Window’


Copyright © 2014 .Wholeworldshere.blogspot.com. Powered by Blogger.

Music

ads 2

Slider

Flickr Images

Visitantes

Category 3

?max-results="+numposts3+"&orderby=published&alt=json-in-script&callback=recentarticles7\"><\/script>");

Category 4

Racing

Search

Travel

Cute

" });

My Place

Videos

Ads

ads

Contact Form

Name

Email *

Message *

Seguidores

Video

Category

News Ticker

Translate Web Into Your Language

Categorias

Pages

Jogos populares